In the world of photography, exposure is a fundamental concept that significantly impacts the quality of your images. For action camera enthusiasts, understanding how to achieve the perfect exposure is crucial, especially when capturing fast-paced moments. This article delves into the essential settings that contribute to optimal exposure on action cameras, particularly focusing on ISO, shutter speed, and aperture.
Exposure refers to the amount of light that reaches the camera’s sensor, which ultimately determines the brightness and detail of your images. A well-exposed photo reveals intricate details and vibrant colors, while an overexposed or underexposed image can lead to lost details and diminished quality.
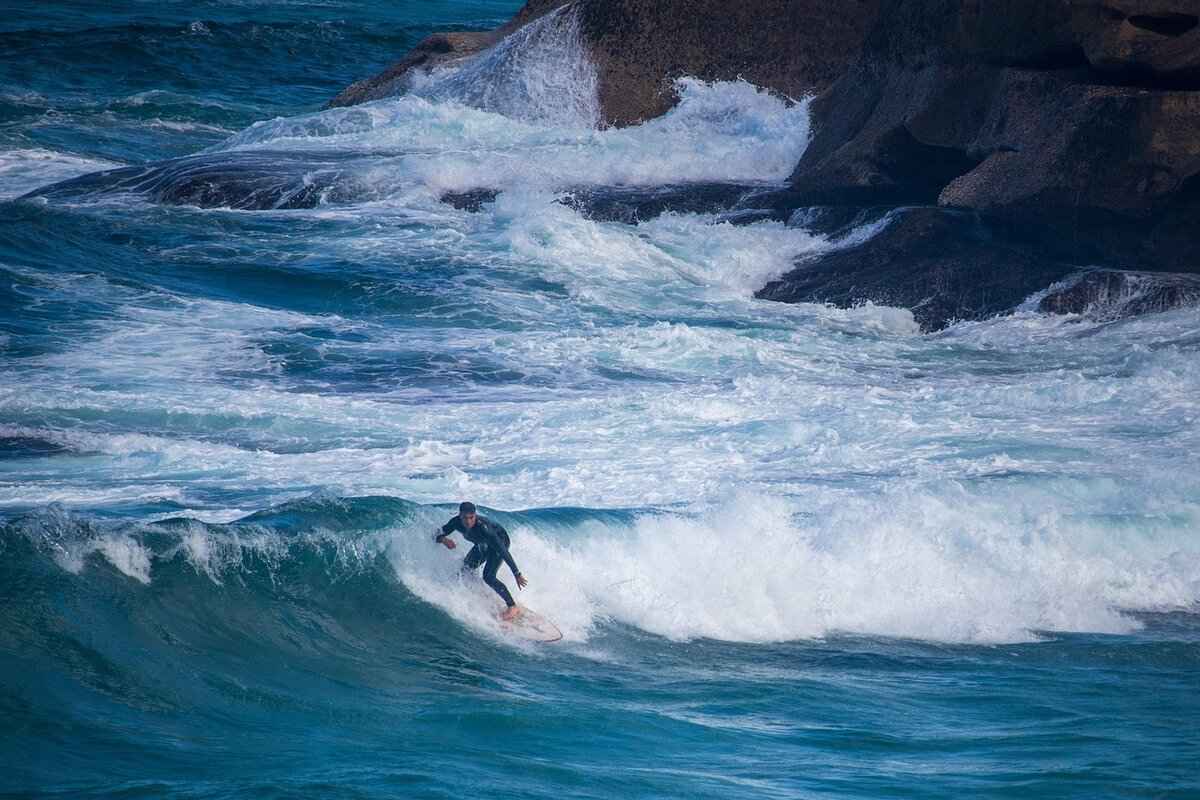
In action photography, proper exposure is vital for ensuring that your shots are neither too dark nor too bright. This balance is particularly important in dynamic environments where lighting conditions can change rapidly. Achieving the right exposure allows you to maintain detail in both shadows and highlights, providing a more immersive viewing experience.
ISO measures the sensor’s sensitivity to light. A higher ISO can improve performance in low-light situations but may introduce noise, which can degrade image quality. Conversely, a lower ISO results in cleaner images but requires more light. It’s essential to find a balance that suits your shooting conditions.
Shutter speed controls how long the camera’s sensor is exposed to light. In action photography, a faster shutter speed is typically preferred to freeze motion, preventing blur. However, slower shutter speeds can create artistic motion blur, which may enhance the sense of speed in your footage.
Aperture determines the size of the lens opening, affecting both the amount of light entering the camera and the depth of field. A wider aperture allows more light, which is beneficial in low-light conditions, while a narrower aperture increases the depth of field, keeping more of the scene in focus. Understanding how aperture interacts with ISO and shutter speed is key to mastering exposure.
Finding the right balance between ISO, shutter speed, and aperture is essential for achieving perfect exposure. One effective method is to use the exposure triangle concept, where adjusting one setting necessitates compensating with another. For example, if you increase the shutter speed to freeze motion, you might need to open the aperture or increase the ISO to maintain exposure.
Capturing action in low light can be challenging. To enhance your footage without sacrificing quality, consider using a higher ISO, a wider aperture, and a slower shutter speed. However, be mindful of the potential for noise and motion blur, and adjust accordingly based on the specific situation.
Manual mode allows you full control over your camera settings, enabling you to fine-tune exposure based on your environment. Familiarize yourself with the settings and practice adjusting them on the fly to achieve the desired results in various lighting conditions.
White balance affects how colors appear in your images, influencing exposure indirectly. Understanding how to adjust white balance can help you achieve accurate colors, particularly in mixed lighting conditions. This is essential for maintaining the realism of your action shots.
The histogram is a valuable tool for assessing exposure. It provides a graphical representation of the tonal range in your image. By learning to read the histogram, you can ensure that your images are well-exposed, avoiding clipping in the highlights or shadows.
Different shooting scenarios require tailored exposure settings. For instance, shooting in bright sunlight may necessitate a lower ISO and faster shutter speed, while shooting indoors might require higher ISO and wider apertures. Being adaptable and understanding your camera’s capabilities will enhance your shooting experience.
- Not checking the histogram before shooting.
- Using automatic settings without understanding their impact.
- Neglecting to adjust settings based on changing lighting conditions.
Avoiding these common pitfalls can significantly enhance your action photography, enabling you to capture stunning, well-exposed footage.

What is Exposure in Photography?
Understanding exposure is a fundamental aspect of photography that every aspiring photographer must grasp to capture stunning images. Exposure refers to the amount of light that reaches the camera sensor, which directly affects the brightness and detail of your photos. Without a proper understanding of exposure, even the most picturesque scenes can become unremarkable due to poor lighting conditions.
Exposure is determined by three primary elements: ISO, shutter speed, and aperture. Each of these components plays a vital role in how light interacts with your camera, and mastering them can elevate your photography to new heights.
- ISO measures the sensitivity of your camera’s sensor to light. A higher ISO setting allows you to shoot in lower light conditions but can introduce noise, which may degrade image quality.
- Shutter speed controls how long the camera’s shutter remains open, allowing light to hit the sensor. Faster shutter speeds freeze motion, which is particularly useful in action photography, while slower speeds can create a beautiful motion blur.
- Aperture refers to the lens opening that lets light in. A wider aperture (lower f-number) allows more light and creates a shallower depth of field, which can help isolate subjects from their background.
To achieve the perfect exposure, it’s essential to find a balance among these three settings. For instance, when shooting in bright daylight, you might use a lower ISO and a faster shutter speed to prevent overexposure. Conversely, in low-light conditions, you may need to increase the ISO and open the aperture wider to allow more light in.
Another critical factor to consider is the lighting conditions. Different environments can drastically affect how exposure settings should be adjusted. For example, shooting in a dimly lit room will require different settings compared to shooting outdoors on a sunny day. Understanding how to adapt your exposure settings based on your surroundings is key to capturing high-quality images.
Additionally, the use of a histogram can be a valuable tool in evaluating exposure. A histogram provides a graphical representation of the tonal values of your image, helping you to identify whether your photo is underexposed or overexposed. By learning to read histograms, you can make informed adjustments to your exposure settings.
In summary, mastering exposure is crucial for any photographer looking to enhance their skills. By understanding the roles of ISO, shutter speed, and aperture, and how they interact with varying lighting conditions, you can take control of your photography and achieve stunning results. Remember, practice is essential, so spend time experimenting with different settings to discover what works best for your style and subjects.

Why is Proper Exposure Important for Action Cameras?
When it comes to capturing action-packed moments with your camera, achieving proper exposure is essential. This aspect of photography plays a crucial role in ensuring that your images are visually appealing and rich in detail. In fast-paced environments, where lighting conditions can change rapidly, maintaining the right exposure can make the difference between a stunning shot and a disappointing one.
Proper exposure ensures that your action shots are neither too dark nor too bright. This balance is vital for preserving the intricate details of your subjects and surroundings. For instance, if you are filming a skateboarder performing tricks under the bright sun, overexposure can wash out the colors and details of the scene. Conversely, if the exposure is too low, the shadows may obscure important elements, making the footage less impactful.
In addition to enhancing visual quality, achieving the right exposure can also affect the mood and tone of your footage. Bright, well-exposed scenes can evoke feelings of excitement and energy, while darker, underexposed shots may convey a sense of mystery or tension. Therefore, understanding how to adjust exposure settings effectively is crucial for any action camera user aiming to tell a compelling story through their visuals.
One of the key factors in achieving proper exposure is the interplay between ISO, shutter speed, and aperture. Each of these elements contributes to the overall exposure and can be adjusted to suit different lighting conditions. For example, in a low-light setting, you might increase the ISO to make the sensor more sensitive to light. However, this can introduce noise, which may compromise image quality. Similarly, adjusting the shutter speed allows you to control how motion is captured; a faster shutter speed can freeze action, while a slower speed can create a sense of movement.
Moreover, the aperture of your lens also plays a significant role in exposure. A wider aperture allows more light to enter the camera, which can be beneficial in dim environments. However, it also affects the depth of field, which can be critical in action photography where you want to isolate your subject against a blurred background.
To truly master exposure in action photography, you must learn to balance these three elements effectively. This balance is not only about adjusting settings but also about understanding the environment you are shooting in. For instance, shooting during the golden hour can provide natural lighting that enhances your footage without requiring drastic adjustments.
Utilizing tools such as the histogram can also aid in evaluating exposure. A histogram provides a visual representation of the tonal range in your image, helping you identify whether you are losing detail in the highlights or shadows. By regularly checking your histogram, you can make real-time adjustments to ensure that your images are well-exposed.
In conclusion, proper exposure is a foundational skill for anyone looking to capture high-quality action shots. By understanding the importance of exposure and how to control it effectively through ISO, shutter speed, and aperture, you can create stunning visuals that truly capture the essence of the moment.

How Does ISO Affect Exposure?
Understanding how ISO affects exposure is vital for photographers and videographers alike, especially when using action cameras. ISO is a critical setting that determines the camera sensor’s sensitivity to light. When you adjust the ISO, you essentially control how much light is needed to achieve a well-exposed image.
In low-light conditions, such as during dawn or dusk, a higher ISO setting can significantly enhance your camera’s performance. For instance, if you’re capturing an action shot while skiing in a dimly lit environment, increasing the ISO allows the sensor to pick up more light, resulting in a brighter image. However, it is essential to note that while a higher ISO can improve low-light performance, it often comes at the cost of introducing noise into the image. This noise manifests as graininess, which can detract from the overall quality of your photos or videos.
Conversely, using a lower ISO setting is beneficial in bright conditions. For example, if you’re shooting on a sunny day at the beach, a lower ISO will help maintain the clarity and detail of your images, preventing overexposure. The goal is to find the right balance that allows you to capture stunning action shots without compromising image quality.
To illustrate how ISO interacts with other exposure settings, consider the following table:
| ISO Setting | Lighting Condition | Effect on Image Quality |
|---|---|---|
| 100 | Bright sunlight | Clear, minimal noise |
| 400 | Overcast day | Good balance, slight noise |
| 1600 | Indoor lighting | Increased noise, but brighter image |
| 3200+ | Low light | High noise, but usable in extreme conditions |
When adjusting ISO, it is also essential to consider the shutter speed and aperture settings. A higher ISO can allow for faster shutter speeds, which are crucial for freezing motion in action photography. However, this can lead to a trade-off between shutter speed and image noise. Therefore, understanding how these settings work together is key to mastering exposure on your action camera.
In conclusion, ISO plays a pivotal role in exposure settings, particularly in dynamic shooting environments. By carefully adjusting your ISO according to the lighting conditions, you can achieve optimal exposure while maintaining the integrity of your images. Experimenting with different ISO settings will not only enhance your technical skills but will also help you develop a more intuitive understanding of how to capture stunning action shots in any scenario.

What is Shutter Speed and How Does it Impact Action Shots?
When it comes to capturing action shots, understanding shutter speed is essential. Shutter speed refers to the duration for which the camera’s sensor is exposed to light. This setting plays a pivotal role in how motion is depicted in your photographs.
Faster shutter speeds, typically measured in fractions of a second (like 1/1000 or 1/2000), are ideal for freezing fast-moving subjects. For instance, if you’re photographing a speeding car or an athlete in motion, a faster shutter speed ensures that the action is captured with impeccable clarity, allowing you to see every detail without any blurring.
On the other hand, slower shutter speeds (such as 1/30 or 1/60) can introduce motion blur, which can be a creative choice in certain scenarios. This technique can convey a sense of speed or movement, making the viewer feel as if they are part of the action. For example, when photographing a cyclist racing by, a slower shutter speed can create a dynamic effect, showing the blur of the wheels while keeping the rider in focus.
In action photography, achieving the right balance between fast and slow shutter speeds can significantly enhance your images. Here are some key factors to consider:
- Lighting Conditions: In bright environments, faster shutter speeds can be used without overexposing the image. Conversely, in low-light situations, you may need to slow down the shutter speed to allow more light to hit the sensor.
- Subject Speed: The speed of your subject is crucial. For fast-moving subjects, you should opt for a faster shutter speed to avoid motion blur. For slower subjects, a slower shutter speed may suffice.
- Camera Stability: Using slower shutter speeds increases the risk of camera shake. To mitigate this, use a tripod or stabilize your camera to ensure sharp images.
Additionally, many action cameras today come equipped with features that help you manage shutter speed effectively. Some models allow for automatic adjustments based on the lighting conditions, while others offer manual settings for those who want complete control over their photography.
As you experiment with different shutter speeds, pay attention to the results. Analyzing your images will help you understand how shutter speed impacts the overall composition and feel of your action shots. Remember, the key is to find a balance that works for your style and the specific action you are capturing.
In conclusion, mastering shutter speed is vital for any photographer looking to excel in action photography. By understanding how to manipulate this setting, you can create stunning images that convey the excitement and energy of the moment.

What is Aperture and How Does it Influence Exposure?
Aperture is a fundamental concept in photography that plays a critical role in controlling the amount of light that enters the camera. It is defined by the size of the lens opening, which can be adjusted to allow more or less light to reach the camera sensor. Understanding aperture is essential for photographers, especially when capturing fast-paced action scenes where lighting conditions can change rapidly.
The aperture setting significantly influences the depth of field, which refers to the range of distance within a photo that appears acceptably sharp. A wide aperture (indicated by a smaller f-number, such as f/2.8) results in a shallow depth of field, blurring the background and foreground while keeping the subject in focus. This technique is often used in portrait photography to isolate the subject from the background.
Conversely, a narrow aperture (larger f-number, like f/16) increases the depth of field, ensuring that more elements in the scene are in focus. This setting is particularly useful in landscape photography, where capturing detail across the entire frame is desired.
The aperture setting directly affects the exposure of an image. When the aperture is wide open, more light enters the camera, resulting in a brighter image. This is particularly beneficial in low-light conditions or when shooting at high speeds. However, using a wide aperture may require adjustments in other settings, such as shutter speed or ISO, to maintain proper exposure.
On the other hand, a narrow aperture allows less light to enter, which can lead to underexposed images in dim lighting. Understanding how to balance aperture with ISO and shutter speed is crucial for achieving optimal exposure in action photography.
In action photography, where subjects are often in motion, the ability to control depth of field and exposure is vital. A wide aperture can help achieve a fast shutter speed, which is necessary for freezing motion and capturing sharp images of moving subjects. However, if the aperture is too wide, you risk losing detail in the background, which may be important to the context of the shot.
Moreover, varying the aperture can also create different artistic effects in your action shots. For example, a shallow depth of field can draw attention to the subject, while a deeper focus can provide context by including more of the surrounding environment.
- Experiment with Different Settings: Don’t hesitate to try various aperture settings to see how they affect your images.
- Use a Fast Lens: Consider using lenses with wider maximum apertures (like f/1.8 or f/2.8) for better performance in low light.
- Combine with Other Settings: Always balance your aperture with ISO and shutter speed to achieve the desired exposure.
- Understand Your Environment: Be mindful of the lighting conditions and adjust your aperture accordingly to maintain proper exposure.
In summary, mastering aperture is crucial for any photographer looking to enhance their action shots. By understanding how aperture influences both depth of field and exposure, you can make informed decisions that elevate your photography skills. Whether you aim to isolate a subject or capture the full context of a scene, the right aperture setting can make all the difference.

How to Balance ISO, Shutter Speed, and Aperture?
Mastering the art of photography, especially with action cameras, hinges on understanding how to balance ISO, shutter speed, and aperture. These three elements work in tandem to create the perfect exposure, ensuring that your images are vibrant and full of detail. In this section, we will delve deeper into how you can adjust these settings harmoniously to capture stunning action shots.
To begin with, it’s essential to understand that ISO measures the sensitivity of your camera’s sensor to light. A lower ISO (e.g., 100 or 200) is ideal for bright conditions, producing clear images with minimal noise. Conversely, in low-light situations, increasing the ISO (e.g., 800 or higher) can help maintain exposure but may introduce graininess. Therefore, finding the right ISO setting is crucial for achieving clarity without sacrificing quality.
Shutter speed plays a pivotal role in capturing movement. It determines how long the camera sensor is exposed to light. For action shots, a faster shutter speed (e.g., 1/500s or quicker) can freeze motion, making it perfect for fast-paced scenes like sports or wildlife photography. However, if you’re looking to convey a sense of motion, a slower shutter speed (e.g., 1/30s) can introduce a blur effect, which can be artistically pleasing. The key is to choose a shutter speed that complements the action you are capturing.
Aperture controls the lens opening, affecting both the light entering the camera and the depth of field. A wider aperture (e.g., f/2.8) allows more light in, which is beneficial in low-light conditions and creates a shallow depth of field, isolating the subject from the background. Conversely, a smaller aperture (e.g., f/11) results in a greater depth of field, keeping more of the scene in focus. Balancing aperture with ISO and shutter speed is vital for achieving the desired exposure and artistic effect.
To find the right balance, consider the exposure triangle, which illustrates the relationship between ISO, shutter speed, and aperture. When you adjust one element, you must compensate with the others to maintain exposure. For instance, if you increase your shutter speed to freeze action, you may need to open your aperture or raise your ISO to ensure enough light reaches the sensor.
- Start with the shutter speed: Determine how fast the action is moving and select an appropriate shutter speed.
- Adjust the aperture: Once the shutter speed is set, adjust the aperture to control the depth of field and light intake.
- Set the ISO: Finally, adjust the ISO based on the available light to ensure the image is well-exposed.
It’s crucial to practice and experiment with these settings to understand their interactions better. Each shooting scenario may require a different approach, and being adaptable will enhance your photography skills. Also, consider using your camera’s manual mode to gain full control over these settings, allowing you to make precise adjustments based on the environment.
In conclusion, finding the right balance between ISO, shutter speed, and aperture is not just about technical settings; it’s about understanding how each element affects your final image. With practice and patience, you will be able to capture breathtaking action shots that truly reflect the moment.

What are the Best Settings for Low Light Conditions?
Capturing action in low light can be particularly challenging, but with the right settings, you can enhance your footage significantly. This section delves into the optimal configurations for ISO, shutter speed, and aperture to ensure that you achieve high-quality results even in dimly lit environments.
ISO is a critical setting when shooting in low light. The ISO value indicates the sensor’s sensitivity to light. A higher ISO (e.g., 1600 or 3200) allows you to capture more light, which is essential in dark settings. However, increasing the ISO can also introduce noise into your images, which can degrade quality. Therefore, it’s important to find a balance. Start with a moderate ISO setting and adjust as needed based on your shooting conditions.
Shutter speed is another vital factor in low light photography. A faster shutter speed (e.g., 1/500s) is ideal for freezing motion, but it requires more light. In low light conditions, you may need to slow down your shutter speed (e.g., 1/60s or 1/30s) to allow more light to hit the sensor. However, be cautious: slower shutter speeds can introduce motion blur, especially in action shots. Consider using image stabilization features if available, or stabilize your camera on a tripod to minimize blur.
Aperture, represented by f-stop numbers (like f/2.8 or f/4), controls how much light enters your camera. A wider aperture (lower f-stop number) allows more light to reach the sensor, which is beneficial in low light situations. This setting also affects the depth of field, allowing you to isolate subjects by blurring the background. For action shots, a good starting point is to use the widest aperture your lens allows.
To achieve the best results in low light, you need to balance these three settings. If you increase your ISO to compensate for low light, you may need to adjust your shutter speed or aperture accordingly. For instance, if you raise your ISO to 1600, you might be able to use a faster shutter speed without compromising exposure. Experiment with different combinations to see what works best for your specific environment.
Using manual mode on your action camera gives you complete control over these settings. This is particularly useful in unpredictable lighting conditions where automatic settings may struggle. By manually adjusting ISO, shutter speed, and aperture, you can tailor your camera to the scene, ensuring optimal exposure for your action shots.
- Use a tripod: This helps stabilize your camera during longer exposures.
- Increase your frame rate: If your camera supports it, shoot at a higher frame rate to capture smoother motion.
- Post-processing: Consider enhancing your footage in post-production to reduce noise and improve clarity.
- Practice: The more you shoot in low light, the better you will understand how to adjust your settings effectively.
In conclusion, capturing action in low light requires a thoughtful approach to your camera settings. By understanding how to manipulate ISO, shutter speed, and aperture, you can create stunning footage that maintains quality and detail. Remember to experiment and practice, as each shooting scenario may require different adjustments for the best results.

How to Use Manual Mode for Better Control?
Manual mode on your camera is a powerful feature that allows you to take full control over your shooting settings. By using manual mode, you can adjust the ISO, shutter speed, and aperture to create the perfect exposure tailored to your specific action shots. This section will delve into how to effectively utilize manual mode for capturing stunning images in dynamic environments.
When you switch to manual mode, you are no longer relying on the camera’s automatic settings. Instead, you take charge of the three critical components of exposure: ISO, shutter speed, and aperture. Each of these elements plays a vital role in how your images turn out, especially in fast-paced situations where light conditions can change rapidly.
- ISO: This setting measures the sensor’s sensitivity to light. In manual mode, you can adjust the ISO to suit your environment. A lower ISO (e.g., 100) is ideal for bright conditions, while a higher ISO (e.g., 1600) is better for low-light situations. However, be cautious, as increasing the ISO can introduce noise into your images.
- Shutter Speed: This controls how long the camera’s sensor is exposed to light. For action shots, a faster shutter speed (e.g., 1/1000s) is crucial to freeze motion and capture sharp images. Conversely, a slower shutter speed can create a sense of movement but may result in blurriness if the subject is too fast.
- Aperture: The aperture setting determines the lens opening, affecting both the exposure and depth of field. A wider aperture (e.g., f/2.8) allows more light in and creates a shallow depth of field, isolating your subject. A smaller aperture (e.g., f/11) increases depth of field, keeping more of the scene in focus.
Balancing these three settings is essential for achieving the perfect exposure. Start by deciding on your desired shutter speed based on the action you are capturing. Then, adjust the ISO and aperture to complement your shutter speed. For instance, if you’re shooting a fast-moving subject, prioritize a high shutter speed, then set your ISO and aperture accordingly to maintain proper exposure.
Utilizing manual mode also allows you to adapt to changing lighting conditions. If you’re outdoors and the sunlight shifts, you can quickly adjust your settings to compensate. This flexibility is particularly beneficial in action photography, where every second counts.
In addition to adjusting these settings, it’s crucial to keep an eye on your camera’s histogram. This tool provides a visual representation of the exposure levels in your image, helping you ensure that your highlights and shadows are well-balanced. Aim for a histogram that is centered, avoiding clipping on either end, which indicates loss of detail in highlights or shadows.
Finally, practice is key. Spend time experimenting with manual mode in various settings and lighting conditions. The more you familiarize yourself with how each setting affects your images, the more adept you’ll become at capturing stunning action shots. Remember, manual mode is not just about technical settings; it’s about expressing your creative vision through your photography.

What is the Role of White Balance in Exposure?
Understanding white balance is essential for any photographer, especially when capturing action shots under varying lighting conditions. White balance directly influences how colors are rendered in your images, ensuring that they appear natural and true to life. When the white balance is set correctly, whites look white, and all other colors fall into place accurately. This is particularly important in action photography, where the lighting can change rapidly and dramatically.
In essence, white balance compensates for the color temperature of the light source. Different lighting conditions—such as daylight, tungsten, or fluorescent—emit different color temperatures, which can lead to color casts in your images. For example, an image taken under tungsten light may appear overly yellow or orange without proper adjustment. Conversely, fluorescent lighting can give a greenish hue. By adjusting the white balance setting on your camera, you can correct these color casts, resulting in more vibrant and realistic colors.
When shooting in action scenarios, the importance of white balance becomes even more pronounced. Fast-moving subjects often require quick adjustments to camera settings, and if the white balance is not set correctly, it can lead to missed opportunities for capturing stunning shots. For instance, if you are shooting an athlete in a park during sunset, the warm light can create beautiful tones, but if your camera’s white balance is set incorrectly, the colors may not reflect the scene as you envisioned.
To effectively manage white balance, it’s crucial to understand the various settings available on your action camera:
- Auto White Balance (AWB): This setting allows the camera to automatically adjust to the lighting conditions. While convenient, AWB may not always produce the best results in dynamic environments.
- Preset White Balance: Most cameras offer presets for common lighting conditions, such as daylight, shade, and tungsten. Selecting the appropriate preset can simplify the process.
- Custom White Balance: For precise control, you can manually set the white balance by using a gray card or a white surface. This method is particularly useful in challenging lighting conditions.
In addition to these settings, understanding the impact of white balance on exposure is vital. While it may not directly influence the amount of light hitting the sensor, it affects how the colors are perceived. For example, images that are too warm may appear brighter, while cooler images might seem darker. This perception can lead to misjudgments in exposure settings, resulting in images that are either overexposed or underexposed.
Utilizing tools such as the histogram can also aid in evaluating the impact of white balance on exposure. A histogram graphically represents the distribution of tones in your image, allowing you to assess whether your exposure is balanced across the spectrum. Keeping an eye on the histogram while adjusting white balance can help ensure that you achieve the desired exposure and color accuracy.
In summary, mastering white balance is essential for capturing high-quality action shots. By understanding its role and how it interacts with exposure settings, you can enhance the overall quality of your photography. Whether you’re shooting in bright daylight or low-light conditions, paying attention to white balance will help you achieve accurate colors and stunning images that truly reflect the moment.

How to Use Histogram for Exposure Evaluation?
Understanding how to use a histogram is essential for any photographer looking to achieve the perfect exposure, especially when using an action camera. A histogram is a graphical representation that displays the distribution of tones in your image, ranging from shadows to highlights. By interpreting this data, you can make informed decisions about your exposure settings to ensure your images are neither too dark nor too bright.
When you take a photo, the histogram appears as a series of peaks and valleys. The left side represents the shadows, the right side the highlights, and the middle section indicates the midtones. A well-balanced histogram will typically show a gradual slope from left to right, indicating a good range of tones. If the histogram is skewed heavily to the left, your image may be underexposed, losing detail in the shadows. Conversely, a histogram that is pushed to the right may indicate overexposure, resulting in a loss of detail in the highlights.
To effectively use histograms, follow these steps:
- Check the Histogram After Shooting: Always review your histogram after taking a shot. This will help you determine if adjustments are necessary before moving on to the next shot.
- Aim for a Balanced Histogram: Strive for a histogram that shows a good distribution of tones across the spectrum. Avoid clipping on either end.
- Adjust Settings Accordingly: If your histogram indicates overexposure, consider lowering your ISO, reducing the aperture, or increasing the shutter speed. For underexposure, the opposite adjustments may be necessary.
Another critical aspect of using histograms is recognizing the impact of lighting conditions. In bright environments, it is easy to misjudge exposure settings. A histogram can provide a more accurate representation than your camera’s LCD screen, which may be affected by glare. In low-light situations, histograms can also help you determine if you’re capturing enough detail in the shadows without introducing unwanted noise.
For action cameras, where lighting can change rapidly, histograms are particularly useful. They allow you to quickly assess exposure and make necessary adjustments on the fly. This is crucial in dynamic environments, such as sports events or outdoor adventures, where you might only have one chance to capture the perfect moment.
In conclusion, mastering the use of histograms is a powerful skill for photographers aiming for optimal exposure. By understanding how to read and interpret histograms, you can enhance your photographic skills and ensure your action camera captures stunning, well-exposed images.

How to Adjust Exposure Settings for Different Scenarios?
When it comes to capturing stunning footage with your action camera, understanding how to adjust exposure settings for different scenarios is essential. Different environments present unique lighting challenges that can make or break your shots. This section offers practical tips to help you navigate various lighting conditions, ensuring your images are always vibrant and well-exposed.
In bright sunlight, your camera is likely to receive an overwhelming amount of light. To avoid overexposure, consider the following adjustments:
- Lower ISO: Set your ISO to the lowest possible setting (usually 100 or 200) to minimize sensitivity to light.
- Fast Shutter Speed: Use a faster shutter speed to reduce the amount of light hitting the sensor, effectively freezing motion and preventing washout.
- Smaller Aperture: A higher f-stop number (like f/8 or f/11) will decrease the size of the lens opening, allowing less light to enter.
Capturing action in low-light conditions can be tricky, but with the right settings, you can achieve great results:
- Increase ISO: Raise your ISO to a higher setting (800 or above) to enhance the camera’s sensitivity to light.
- Slow Shutter Speed: Use a slower shutter speed to allow more light to reach the sensor. However, be cautious, as too slow a speed can introduce motion blur.
- Larger Aperture: Open up your aperture (lower f-stop number like f/2.8) to let in more light, which is crucial for low-light environments.
Indoor settings often have mixed lighting conditions, making exposure adjustments vital:
- Moderate ISO: Start with an ISO of around 400-800, adjusting as necessary depending on the lighting.
- Balanced Shutter Speed: Use a shutter speed that balances light and motion, typically around 1/60 to 1/125 seconds for indoor action.
- Aperture Considerations: A wider aperture (like f/4) can help in dimly lit rooms, providing a good depth of field while allowing more light in.
Overcast conditions can create a soft, diffused light, which can be beneficial:
- Moderate ISO: Keep your ISO around 200-400 to capture the softer light without introducing too much noise.
- Standard Shutter Speed: A shutter speed of 1/125 seconds is often sufficient to avoid motion blur while capturing action.
- Aperture Settings: A mid-range aperture (like f/5.6) can provide a good balance between depth of field and light entry.
Nighttime shooting presents unique challenges, but with the right settings, you can capture stunning night scenes:
- High ISO: Use a high ISO setting (1600 or higher) to capture more light in dark conditions.
- Longer Shutter Speed: A longer shutter speed (1 second or more) can help gather more light, but use a tripod to avoid camera shake.
- Wide Aperture: Utilize a wide aperture (f/2.8 or lower) to maximize light capture and create a beautiful bokeh effect.
By understanding and adjusting your exposure settings according to these different scenarios, you can ensure that your action camera captures the best possible footage, regardless of the lighting conditions. Mastering these techniques will enhance your photography skills and help you achieve stunning results in every situation.

What are Common Mistakes to Avoid in Exposure Settings?
When it comes to action photography, achieving the perfect exposure can be a challenging endeavor. Understanding common mistakes in exposure settings is vital for enhancing your photography skills. This section delves into frequent pitfalls photographers encounter and offers practical solutions to correct them, ensuring you capture stunning action shots every time.
- Neglecting to Adjust ISO: Many photographers forget to modify the ISO setting based on lighting conditions. Using a high ISO in bright environments can lead to grainy images, while a low ISO in low-light situations may result in underexposed photos. Always assess your surroundings and adjust accordingly.
- Incorrect Shutter Speed: Action photography often requires fast shutter speeds to freeze motion. A common mistake is using a shutter speed that is too slow, which can blur your subject. As a rule of thumb, use a shutter speed that is at least double the frame rate of your action to achieve sharp images.
- Ignoring Aperture Settings: Aperture plays a crucial role in exposure and depth of field. Many photographers overlook this setting, resulting in either too much or too little focus on the subject. Experiment with different apertures to find the right balance for your action scenes.
- Relying Solely on Automatic Mode: While automatic settings can be convenient, they often fail to deliver the best results in dynamic environments. Switching to manual mode allows you to fine-tune ISO, shutter speed, and aperture based on the specific conditions of your shoot.
- Overlooking White Balance: The white balance setting is essential for accurate color representation. Failing to adjust it based on the lighting conditions can lead to unnatural color casts in your images. Always check your white balance, especially when moving between different light sources.
- Not Using the Histogram: The histogram is a powerful tool for evaluating exposure. Many photographers ignore it, leading to poorly exposed images. Familiarize yourself with how to read histograms to ensure your shots are well-balanced between shadows and highlights.
- Inconsistent Exposure Settings: Changing locations or lighting conditions without adjusting your exposure settings can result in inconsistent image quality. Always take a moment to reassess your settings when moving to a new environment.
- Failing to Test Shots: Skipping test shots can lead to missed opportunities. Always take a few practice shots to check your exposure settings before capturing the main action. This allows you to make necessary adjustments on the fly.
By being aware of these common mistakes and implementing the suggested corrections, you can significantly enhance your action photography. Remember, practice makes perfect, so don’t hesitate to experiment with different settings and techniques to find what works best for you.
Frequently Asked Questions
- What is the best ISO setting for action shots?
The ideal ISO setting for action shots typically ranges from 100 to 800. In bright conditions, keep it low to avoid noise, while in low-light situations, you may need to increase it. Just remember, higher ISO can introduce graininess!
- How fast should my shutter speed be for capturing fast action?
A shutter speed of at least 1/500th of a second is recommended for freezing fast motion. If you’re shooting something even quicker, like a sports event, consider going up to 1/1000th or faster to ensure clarity!
- What aperture should I use for action photography?
For action photography, a wider aperture (like f/2.8 or f/4) is often preferred as it allows more light in and creates a beautiful background blur, helping your subject stand out. Just be mindful of your depth of field!
- Can I use automatic settings for action shots?
While automatic settings can work, they might not always give you the best results. Manual mode allows you to fine-tune ISO, shutter speed, and aperture for optimal exposure, especially in dynamic environments.
- What should I do if my images are too bright or too dark?
If your images are too bright, try lowering the ISO or increasing the shutter speed. If they’re too dark, increase the ISO or decrease the shutter speed. Adjusting these settings can help you achieve that perfect shot!


